
How to Make Honey Garlic Sauce: Your Epic Guide to Sweet & Savory Mastery!
Alright, fellow food adventurer, gather ’round! Have you ever stood in front of your fridge, gazing at a lonely piece of chicken or a humble bowl of rice, and thought, “Man, this needs… something?” If your mind immediately conjured up images of sticky, glossy, sweet, and intensely savory magic, then my friend, you were thinking about honey garlic sauce. And guess what? You’re in the right place.
Today, we aren’t just making honey garlic sauce; we’re embarking on a journey to understand its very soul. We’re going to transform you from a curious bystander into a true honey garlic artisan. Because, let’s be honest, while store-bought versions exist, they often taste like a pale imitation of the real deal. Plus, the satisfaction of creating something this ridiculously delicious with your own two hands? Priceless. So, let’s skip the small talk and dive right into the sticky, garlicky goodness!
The Unrivaled Allure of Honey Garlic Sauce: Why It Reigns Supreme
Seriously, why is honey garlic sauce so universally adored? Is it some ancient culinary secret passed down through generations? Perhaps a potion concocted by mischievous kitchen gnomes? Not quite, though it feels like magic, doesn’t it? The truth is, its appeal lies in its perfect balance. You get the comforting sweetness of honey, a natural sugar with its own unique floral notes, perfectly counterpointed by the pungent, earthy warmth of fresh garlic. Add a dash of salty umami from soy sauce, a touch of tangy vinegar to cut through the richness, and you’ve got a symphony of flavors hitting every single one of your taste receptors.
Think about it:
- Sweetness: The honey provides a natural, complex sweetness that caramelizes beautifully. It’s not just “sweet” but carries hints of the flowers the bees visited, adding a nuanced depth.
- Savory Depth: Soy sauce is your umami powerhouse. It introduces a salty, fermented richness that grounds the sauce and makes it incredibly satisfying.
- Aromatic Kick: Fresh garlic, when gently cooked, releases compounds that are both pungent and wonderfully aromatic. It’s the backbone of the “garlic” in honey garlic.
- Balancing Act: Rice vinegar (or apple cider vinegar, in a pinch) provides that essential tang. It cuts through the sweetness and richness, preventing the sauce from becoming cloying and leaving a clean finish on your palate. Without it, the sauce can feel a bit flat, like a joke without a punchline.
This dynamic interplay is why this sauce isn’t just a condiment; it’s a flavor enhancer that elevates almost anything it touches. From humble weeknight dinners to impressive party appetizers, honey garlic sauce steps up to the plate, every single time. And honestly, it’s far less temperamental than baking sourdough, which, let’s be honest, is a commitment.

Assembling Your Flavor Arsenal: Essential Ingredients for Perfection
Alright, time to get our mise en place on! You don’t need a fancy molecular gastronomy lab for this, just a few key players. Quality matters here, so pick the best you can find.
- Honey (The Sweet Maestro):
- What to use: Any good quality honey will do, but consider a local, raw honey if you can find it. Wildflower honey offers a classic, balanced flavor, while something like clover or even a darker buckwheat honey can add interesting nuances.
- Why it matters: The type of honey subtly impacts the final flavor profile. Avoid highly processed, ultra-filtered honey if you can, as it lacks the complex aromatics. This is where your sauce gets its signature stickiness and beautiful glaze.
- Garlic (The Pungent Heartbeat):
- What to use: Fresh garlic, always! Seriously, I cannot stress this enough. Garlic powder has its place, but it simply doesn’t deliver the same vibrant, aromatic punch as freshly minced cloves. You want that robust, slightly spicy kick.
- Why it matters: Fresh garlic releases essential oils when crushed or minced, which are crucial for the sauce’s characteristic flavor. Burnt garlic, however, becomes bitter, so watch it like a hawk!
- Soy Sauce (The Umami MVP):
- What to use: A good quality, regular soy sauce (like Kikkoman or Yamasa) is perfect. If you’re watching sodium, opt for a low-sodium version. For a gluten-free option, tamari works wonderfully.
- Why it matters: This isn’t just about salt; it’s about umami – that savory, meaty depth that makes food incredibly satisfying. It also lends a beautiful dark color to the sauce.
- Brown Sugar (The Caramel Companion):
- What to use: Light or dark brown sugar. Dark brown sugar will give a slightly richer, more molasses-like flavor, while light brown is a bit milder. Either works beautifully.
- Why it matters: While honey provides sweetness, brown sugar adds a deeper, almost caramel-like complexity. It also contributes to that desirable thick, glossy texture. Think of it as honey’s very supportive best friend.
- Rice Vinegar (The Tangy Balancer):
- What to use: Regular rice vinegar. Avoid seasoned rice vinegar, which often contains added sugar and salt, unless you’re prepared to adjust the other ingredients accordingly.
- Why it matters: This acidic component is crucial! It cuts through the richness and sweetness, preventing the sauce from tasting flat or overly sweet. It’s the secret ingredient that makes the flavors pop.
- Water (The Consistency Regulator):
- What to use: Just plain old tap water.
- Why it matters: It helps create the initial liquid base for your sauce and allows the flavors to meld before thickening. You can always adjust the final consistency with a bit more water if it becomes too thick.
- Cornstarch (The Thickening Wizard):
- What to use: Regular cornstarch (corn flour in some regions).
- Why it matters: This is your best friend for achieving that perfect, glossy, luscious consistency. Mixed with a bit of cold water to form a “slurry,” it prevents lumps and ensures a smooth, thick sauce. Ever tried to thicken a sauce without a slurry? It’s like trying to herd cats – messy and often unsuccessful.
Optional Superstars & Flavor Amplifiers:
- Toasted Sesame Oil: A few drops at the very end add a wonderful nutty, aromatic finish. Don’t add it too early, as its flavor can dissipate with prolonged cooking.
- Red Pepper Flakes: For those who crave a little heat, a pinch or two adds a subtle warmth without overwhelming the core flavors.
- Fresh Ginger: A teaspoon of freshly grated ginger adds a bright, zesty, slightly peppery note that complements the garlic beautifully. It’s fantastic in Asian-inspired dishes.
- Unsalted Butter: A knob of butter melted with the garlic at the start adds a rich, luxurious mouthfeel to the sauce. Totally optional, but definitely a chef’s secret for extra indulgence.
The Art of Sauce Crafting: Step-by-Step to Honey Garlic Nirvana
Alright, saucepan on the stove, ingredients prepped, ready for action? Let’s do this!
- Prep Your Garlic (And Optional Butter):
- Action: If using butter, melt it in a medium saucepan or small pot over medium heat. Once shimmering, add your minced garlic.
- Why: A little fat helps to gently sauté the garlic, coaxing out its aromatic compounds without browning it too quickly. We’re aiming for fragrant, not burnt, garlic. Burnt garlic tastes acrid and will ruin your sauce, so keep a close eye on it! Stir constantly for about 30-60 seconds until you smell that unmistakable, delicious garlic aroma.
- Combine the Wet Ingredients:
- Action: Immediately pour in the honey, soy sauce, brown sugar, rice vinegar, and water into the saucepan with the garlic. Whisk everything together thoroughly until the brown sugar has dissolved.
- Why: You want a smooth, homogenous base for your sauce. Whisking ensures all the sweet and savory components are fully incorporated before you introduce the thickener.
- Bring to a Simmer:
- Action: Increase the heat slightly to medium-high and bring the mixture to a gentle simmer. Stir occasionally to prevent anything from sticking to the bottom.
- Why: Simmering helps the flavors meld and deepen. It also brings the sauce to the right temperature for the cornstarch to activate properly.
- Create the Cornstarch Slurry:
- Action: While the sauce is heating, in a small separate bowl, whisk together the cornstarch with 2 tablespoons of cold water. Make sure there are absolutely no lumps – it should be a milky, smooth liquid.
- Why: This “slurry” (a technical term for a mix of starch and liquid) is crucial. Adding dry cornstarch directly to a hot liquid will result in lumps, and trust me, nobody wants lumpy sauce. Cold water helps dissolve the starch without it clumping.
- Thicken Your Masterpiece:
- Action: Once the sauce is simmering, slowly pour the cornstarch slurry into the saucepan while continuously whisking. Keep whisking for 1-2 minutes.
- Why: Continuous whisking is key here. It distributes the cornstarch evenly and prevents it from settling at the bottom and burning, or clumping into gelatinous blobs. You’ll notice the sauce begin to thicken almost immediately, becoming glossy and opaque.
- Simmer to Perfection:
- Action: Continue to simmer the sauce for another 2-3 minutes, still whisking, until it reaches your desired consistency. It should be thick enough to coat the back of a spoon. It will also thicken a bit more as it cools.
- Why: Simmering ensures the cornstarch is fully cooked out, preventing any starchy taste, and allows the sauce to reach its optimal thickness.
- The All-Important Taste Test & Adjustments:
- Action: Remove the saucepan from the heat. Now, take a small spoonful and taste it. This is your sauce, after all!
- Why: This is where you customize it.
- Too sweet? Add a tiny splash more rice vinegar or soy sauce.
- Not sweet enough? Stir in another teaspoon of honey or brown sugar.
- Needs more zing? A tiny pinch more garlic or ginger.
- Too thick? Whisk in a tablespoon of hot water until it reaches your desired consistency.
- Too thin? Make another small cornstarch slurry (1 tsp cornstarch + 1 tbsp cold water) and whisk it in, then simmer for another minute until it thickens.
- Optional: This is also the time to whisk in those optional extras like toasted sesame oil or red pepper flakes.
- Cool and Conquer:
- Action: Let the sauce cool slightly before using. It will thicken up a bit more as it cools.
- Why: This allows the flavors to settle and prevents you from burning your tongue while slathering it on everything!
Honey Garlic Sauce: The Amazing Versatility
Now that you’ve got this liquid gold, what the heck do you do with it? Oh, the possibilities are endless! This isn’t just a chicken wing sauce; it’s a culinary chameleon.
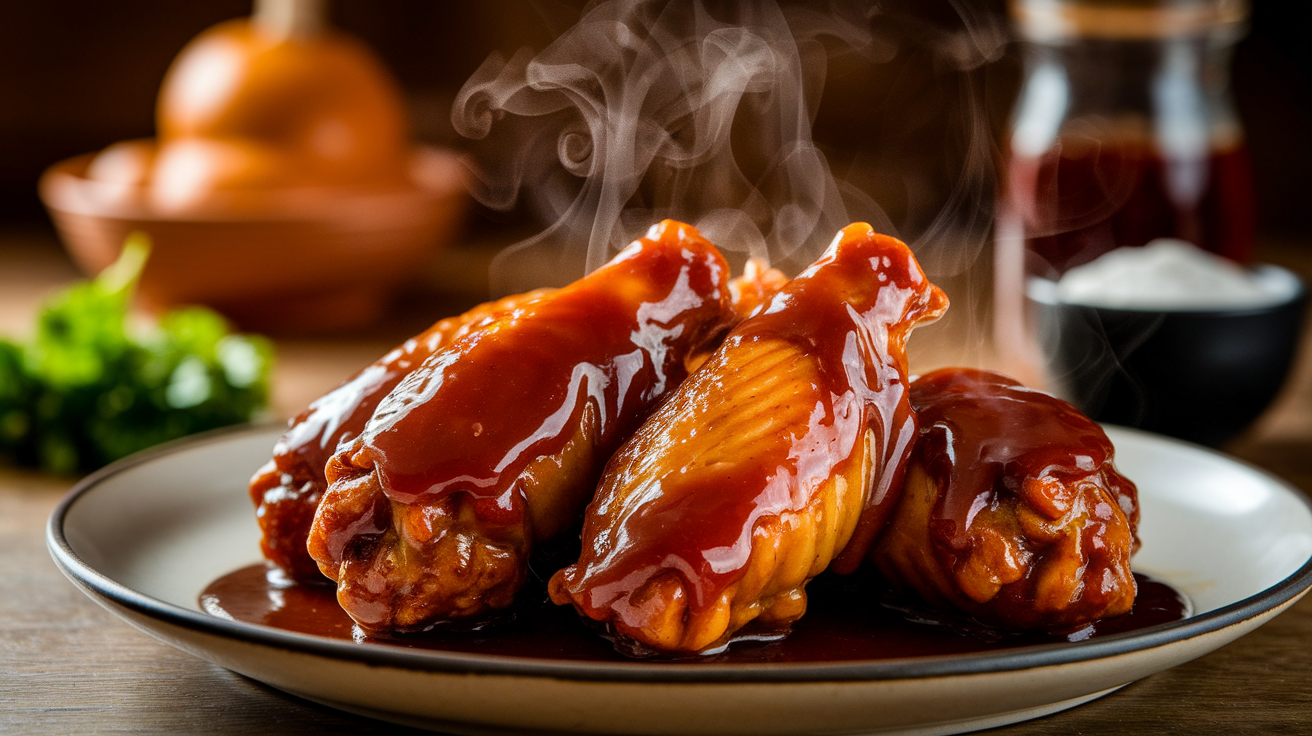
- The Undisputed King: Honey Garlic Wings & Drumsticks: Toss baked or fried chicken pieces in the warm sauce until glistening. Serve with a sprinkle of sesame seeds and chopped green onions. Perfection, every single time.
- Stir-Fry Sensation: Use it as the primary sauce for any stir-fry. Sauté your favorite proteins (chicken, beef, tofu, shrimp) and a medley of vegetables (broccoli, bell peppers, carrots, snap peas). Pour the sauce over everything during the last few minutes of cooking and toss to coat. Serve over fluffy rice.
- Glorious Glaze: Brush it generously over baked salmon fillets, roasted pork tenderloin, or even roasted vegetables (like Brussels sprouts or carrots) during the last 10-15 minutes of cooking. The honey will caramelize, creating a beautiful, sticky crust.
- Dipping Dynamo: Set it out as a dipping sauce for homemade chicken nuggets, spring rolls, crispy wontons, tempura vegetables, or even simple French fries. Trust me, it beats ketchup hands down.
- Marinade Magic: Marinate chicken thighs, pork chops, or even firm tofu cubes for at least 30 minutes (or up to 4 hours in the fridge) before grilling, baking, or pan-frying. The sauce penetrates the protein, infusing it with incredible flavor.
- Meatball Marvel: Simmer pre-cooked meatballs (beef, turkey, or even vegetarian) in a batch of honey garlic sauce for a super easy appetizer or main course. Just thinking about it makes me hungry.
- Instant Noodle Upgrade: Feeling lazy? Cook instant ramen or noodles, drain most of the water, and stir in a few tablespoons of your homemade honey garlic sauce. Add some quick-cooking veggies and a fried egg for an elevated meal.
Troubleshooting Your Honey Garlic Sauce: Common Hiccups & Fixes
Even the best chefs occasionally face a minor hiccup. Don’t panic, it’s usually an easy fix!
- Sauce is Too Thin: You likely need more cornstarch. Whisk a small amount (1-2 tsp) of cornstarch with an equal amount of cold water to make a slurry. Slowly whisk this into the simmering sauce until it reaches your desired thickness.
- Sauce is Too Thick: Easily remedied! Whisk in a tablespoon of hot water at a time until it thins to your liking.
- Sauce is Lumpy: This usually happens if the cornstarch wasn’t fully dissolved in the slurry, or if it was added too quickly to the hot liquid without constant whisking. While hard to fix perfectly, you can try passing it through a fine-mesh sieve. Live and learn for next time!
- Garlic Tastes Bitter: Oh no, you probably overcooked or burned the garlic at the beginning. Unfortunately, this flavor is hard to remove. You might need to start over, paying closer attention to the garlic.
- Sauce is Too Salty: If it’s too salty from the soy sauce, add a bit more honey and water to dilute the saltiness. A tiny squeeze of lemon juice can also sometimes help balance excessive salt.
- Sauce is Too Sweet: Add a little more rice vinegar or a tiny splash more soy sauce to balance the sweetness. A pinch of red pepper flakes can also distract from overwhelming sweetness.
Storing Your Golden Elixir: Keeping the Magic Alive
You’ve whipped up a big batch (because, why wouldn’t you?). How do you store it?
- Refrigeration: Once completely cooled, transfer your honey garlic sauce to an airtight container (a mason jar works perfectly) and store it in the refrigerator for up to 7-10 days.
- Reheating: The sauce will likely thicken considerably in the fridge. When you’re ready to use it, simply reheat it gently in a saucepan over low heat, whisking in a tablespoon or two of hot water or chicken broth until it reaches your desired consistency. Don’t zap it too aggressively in the microwave, as it can separate.
The Sweet Conclusion: You Are Now a Honey Garlic Sensei!
And there you have it! Your comprehensive, no-holds-barred guide to making honey garlic sauce. From understanding its fundamental flavor components to troubleshooting minor culinary mishaps, you’re now equipped with all the knowledge to conquer the kitchen with this incredible sauce.
So, go forth! Impress your friends, delight your family, and bask in the glory of creating something truly delicious from scratch. Remember, cooking is all about experimenting and having fun. And if you make a little mess? That’s just proof you were having a good time. Now go get saucy! You’ve totally got this.